The logistics of archiving unstructured data to the cloud can be a challenge if your Internet connection is too slow or busy to support the transfer of a large data set.
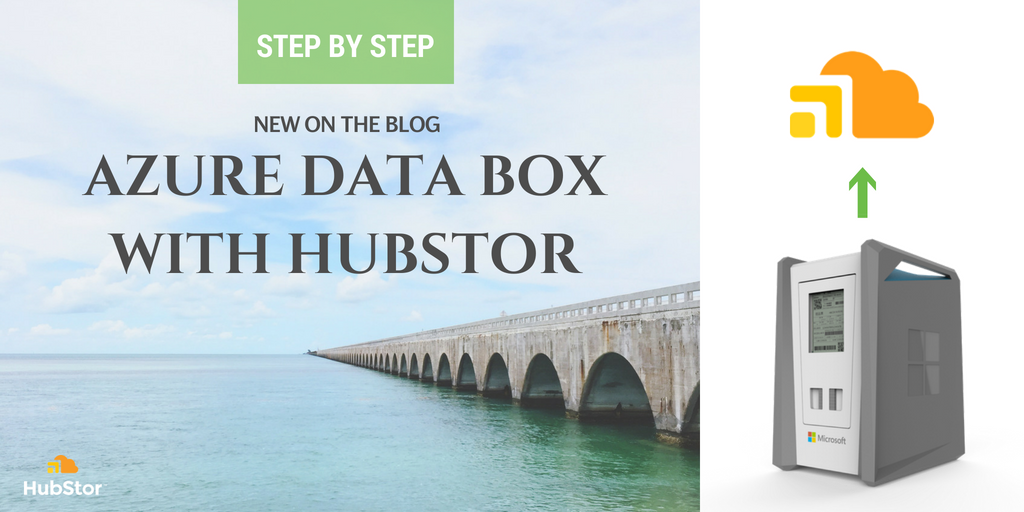
Never fear because the Azure Data Box is here! It allows you to quickly and easily move massive amounts of data into HubStor via Azure Blob Storage -- especially handy in situations where bandwidth is an issue.
HubStor is certified to work with the Azure Data Box. This blog post walks you through the new drive-shipping experience end to end including the steps to get the data into HubStor with synchronization of the data's original metadata and security access rights.
Process Overview
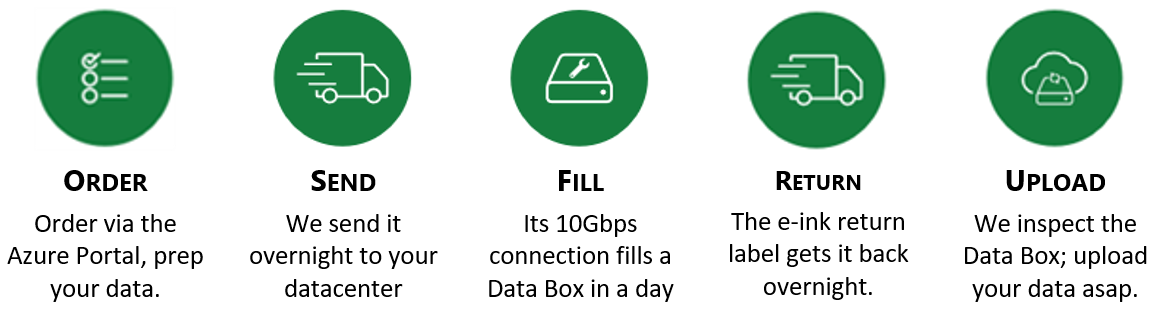
The Microsoft process for Azure Data Box is very simple. Here are the steps involved:
- Ingestion to HubStor -- the Azure Blob Storage account that contains the data loaded from Data Box is processed by HubStor to bring the data into a blob storage account within your HubStor tenant. This process runs entirely in the cloud and is fully managed by HubStor.
- Sync of original metadata (aka. 'blobless archive') -- the HubStor Connector Service (HCS) runs against the original storage mount point containing the source data in order to match the original file attributes (i.e. last modified, created, etc.) and security information (i.e. access control lists, data ownership) with the drive-shipped content.
CLICK HERE TO DOWNLOAD: THE ULTIMATE GUIDE TO USING AZURE DATA BOX WITH HUBSTOR
The Ordering Process
The ordering process occurs, as one might expect, through the Azure portal. A new blade called “Data Box” has been added in the Azure portal, from which you can place new orders, as well as manage your existing orders.
Ordering a Data Box is as simple as clicking the add button and filling in the required information.
First the shipping address:

Next, you specify the resource group and storage account which will be the destination wherein Microsoft will place the data that you copy to the device. This can be a new or existing storage account.

And that's really all there is to placing the order. Click the "Create" button, and your order is created, and will be shipped. You can always check on the status of a Data Box order by selecting it in the portal. Here’s the status of our device which has already arrived:

Device Arrival and Unpacking
At last the day came -- we received our Data Box in a durable shipping container.
Upon opening the container, we found the Data Box itself, all required cables (including two 10 Gbps ethernet cables), and some handy instructions to get us started.
Getting the device up and running couldn't be simpler: Simply plug it in, connect the management interface (which has a hardcoded IP address), and at least one of the data ports (there is a 1 Gbps port, in addition to the two 10 Gbps ports).
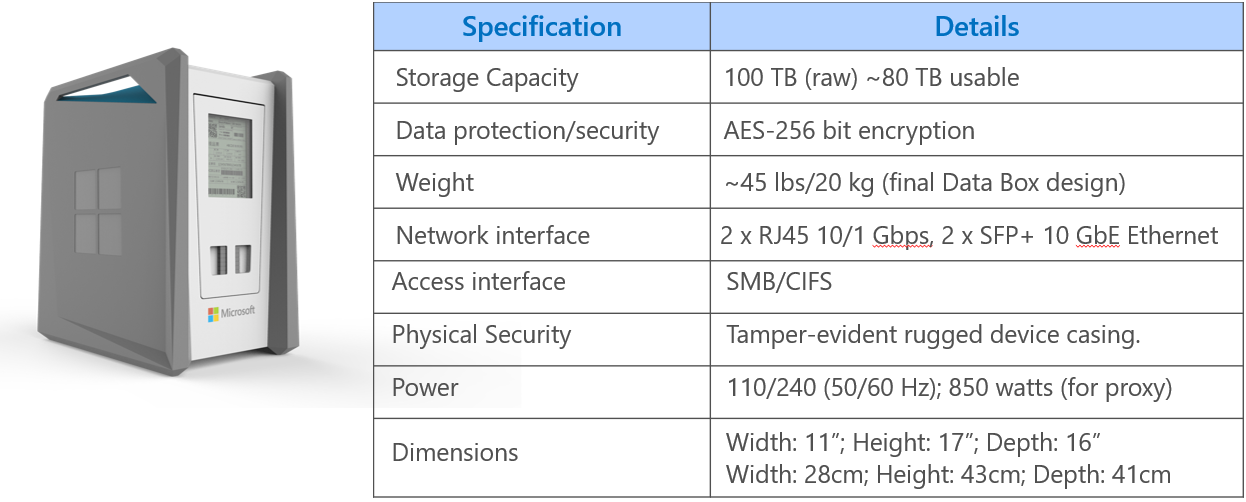
We were pleasantly surprised: Expecting to have our office sound like an airport runway, we found the Data Box was incredibly quiet.
DOWNLOAD DATASHEET: HUBSTOR WITH AZURE DATA BOX
The Configuration
Now that the device was powered up and properly connected, the next step was to configure it. As we mentioned, the management port is configured to a specific subnet and IP address. This means you will need an ethernet adapter that is connected to the same subnet in order to access the Data Box administration portal. In our case, we used a machine with two 1 Gpbs network cards, only one of which had ever been used, so it was simply a matter of configuring the second card, and connecting it to the Data Box management port.
With the connections complete, browsing to https://192.168.100.10 connected us with the Data Box:

Device password - good question! Back to the Azure portal to look at the "Credentials" blade, where all required information is displayed:

Plugging in the device password unlocked the device, and brought us to an extremely simply Web interface on which we could finish configuring the device.

In the above screenshot, we are already transferring data to the Data Box, so that is why it's reporting 3.2 TB of used space. To get to the point of transferring data, the only thing you need to do is visit the "Set network interfaces" page to configure the data port. We used the 1 Gbps data port for testing to a static IP to make it easier to find on our network.
Connecting for Data Transfer
The Data Box itself presents on the network simply as a couple of large shares, depending on what type of Azure storage you wish to have the data created as:

As you can see, in our configuration there are two shares: one for files you want to wind up in the Azure storage account as block blobs; another for those files you want in Azure storage as page blobs. In our case, accessing \\10.44.44.235\devdatabox_BlockBlob was the share for block blob destine files, and \\10.44.44.235\devdatabox_PageBlob was the share for page blob destine files.
Of course, both shares are password protected, but simply clicking the proper "Get credentials" button above displays a dialog with the required user name and password.
Interestingly, you can see there is an option for checksum computation, which is enabled by default. This option will allow you -- once the data has been updated to your storage account -- to download a file containg the CRC64 for every file you copied to the Data Box. If desired, this CRC64 can be used to verify the integrity of the file for chain of custody or other reasons.
Transferring Data to the Azure Data Box
Next up: Transferring data to our Data Box. This is really as simple as just copying folders and files, as you would to move data to any other share on your network. However, there are some important caveats to consider, as follows:
- Any root level folders you create in either share will ultimately be created as containers in the storage account. Thus, these root level folder names must conform to the Azure restrictions on container names (see here for more details).
- Any non-root level folders you create will simply be persisted as part of the blob path in storage account. As a result, all the usual naming restrictions apply for blob paths in Azure.
- Any files you create will become, as you'd expect, blobs in your storage account, and thus must adhere to naming restrictions for blobs in Azure.
Fortunately, with the exception of the restrictions on container names, the above requirements are not likely to be an issue for our scenario. For our testing we had two goals:
- Validate HubStor's 'blobless archive mode' -- 'Blobless archive' archive is a unique feature in HubStor that works with all methods of drive shipping to keep the data's original metadata and security ACLs in tact with drive-shippped workloads. For this exercise we relied on several data sets we have for testing. Contact HubStor for more details about how we seamlessly integrate with drive shipping or Data Box to get your data archived, with all original metadata intact.
- Put the Data Box device itself through its paces, to validate for Microsoft the proper operation of the device at scale.
For the second goal, we didn't happen to have 80 TB of data lying around that we could load into the Data Box. Instead, we put our engineers to work and developed a custom application, inventively named "Data Box Tester", that we could use to generate a folder structure and random files of a given size on the Data Box. This allows us to easily perform edge testing (e.g. 4.5 TB files, complex directory trees with many small files, etc.).
For each file we generated on the Data Box, our tester utility recorded the details of the file along with a 64-bit checksum of the file, which we later used to validate that what we put into the Data Box is indeed what landed in our Azure storage account.
Here's the test utility in action, busily loading 5+ million 1 MB files, spread out over 1,111 directories:

In total, we pushed about 32 TB totaling about 33 million files of various sizes and directory structures onto our Data Box. We used our tester utility (which tracked the files and their checksums) to randomly validate over 5 million of those files (totaling about 5 TB of data retrieved). Everything was as expected with 0% data loss or corruption.
With a fair amount of data on the device, it is time to ship it back to Microsoft, and wait for our data to be copied to our storage account, at which time we can use our validation functionality to make sure that what we put in is what we got out. We'll then complete the ingestion of the data into HubStor to validate our end-to-end solution with Data Box.
Returning the Device
Using the portal, we prepare the Data Box for shipment:

This process ran for two minutes...

With the device prepared for shipping, our drive letters went offline and were inaccessible for copying more data. Once in a locked state, we were also able to download the file list for an inventory of the data we placed are about to ship to Microsoft. At this point, it is a matter of powering down the device and coordinating with the shipping company to come and pick up the form factor.

Transferring Data to HubStor
At this point, the device has return shipped to Microsoft and they have successfully loaded our data to our Azure Blob Storage account. Now it is time to get this data into a storage account in HubStor.
This process runs entirely in the cloud and can be fully managed by HubStor (or you can do it yourself if you're familiar with the HubStor Connector Service).
To get the drive-shipped data into HubStor, we fired up a Windows VM in Azure and installed the HubStor Connector Service (HCS) software. After giving HCS the URL of our HubStor tenant and the credentials of its Azure AD account, we were able to set up a connector to our Azure blob account which has the content loaded from Data Box.
The HCS has an out-of-the-box connector for Azure Blob Storage accounts:

Setting up the connector in the HCS was easy. We had to give it a name, provide some connection details, and specify the destination storage account (Stor) within our HubStor configuration:

With the connector created, we manually kicked off the connector crawl job to process the data.
Run 'Blobless Archive' Crawl Job to Sync Original Metadata and Security Information
The 'Blobless Archive' crawl process is extremely fast because it does not involve transferring blobs over your Internet connection (since they've been ingested through Data Box).
In the HCS, when a file system connector runs in 'blobless mode', it knows to suppress actual file transfer of items meeting the write policy and instead process the metadata and ACL information only.

Once complete, the HCS can continue to run against the source file path in a normal mode. To do this, we simply uncheck the 'Blobless Archive' setting. Now, on the next crawl of the source file directory, the storage tiering and/or delete policy can take effect to virtualize/remove the data along with capturing the incremental of anything new such as file versioning changes, ACL changes, deletions, and ingestion of new items.
Conclusion
At this point we are very comfortable recommending our customers to use Data Box.
HubStor is Azure Data Box certified.
Remember, with HubStor you can use a combination of drive-shipping such as Azure Data Box and network-based ingestion via the HubStor Connector Service. We make it easy to optimize your ingestion strategy given your workloads, organizational requirements, office locations, available bandwidth, and time constraints.
Resources
CLICK HERE TO DOWNLOAD: THE ULTIMATE GUIDE TO USING AZURE DATA BOX WITH HUBSTOR
DOWNLOAD DATASHEET: HUBSTOR WITH AZURE DATA BOX