With EMC Centera having reached its end-of-life, Centera customers are faced with the need to migrate data off aging Centera devices to a new home. Our post Migrating from EMC Centera to the HubStor Cloud – WORM Compliant Storage pointed out that the current options were to either:
- Manage the migration yourself, a proposition most organizations lack the expertise to do; or
- Engage a specialized migration company to assist with moving the Centera data. In either case, getting your Centera data migrated is an expensive proposition.
But what if there was a way to migration your data at no cost to an industry-leading WORM compliant cloud platform that simplifies immutable storage compliance for any workloads? Enter HubStor, the cloud data platform designed for storing data needing WORM retention, auditing, discovery searching, litigation hold, all delivered on a highly-secure, single-tenant, SOC 2-compliant platform with storage pricing for long-term retention as low as $0.81 per terabyte monthly.
A subscription to HubStor now includes Centera migration software, able to seamlessly migrate any data from your EMC Centera devices directly to HubStor, for free, including support from our highly experienced engineers to help you every step of the way through the migration process.
This post will delve into a sample EMC Centera migration in detail. I highly recommend you read Migrating from EMC Centera to the HubStor Cloud – WORM Compliant Storage first, to get an overview of the process, and understand HubStor’s pricing. But if you want to see the nitty-gritty details of how data can be pulled off Centera and into the cloud, read on!
EMC Centera migration steps
HubStor’s Centera migration has four basic steps, as follows::
- Raw extraction. Pulls raw object data out of Centera, serving as the input for the analysis step.
- Analysis. Uses the output from the raw extraction step to figure out the structure of your Centera data, and what metadata can be leveraged to filter and structure that data during the migration.
- Migration preparation. Using the information gleaned from the analyze step, structures the migration preparation crawl of the HubStor Centera Migrator Utility to traverse all clips on the Centera device, and stage the target clip IDs hierarchically for ingestion to HubStor.
- Migrate. Moves the data directly from your EMC Centera device into the HubStor cloud using the HubStor Connector Service, synchronizing WORM retention periods and maintaining a seamless chain of custody.
In the next sections, I will outline what is involved within each step in more detail.
Step 1: Raw extraction
The first step in your EMC Centera migration is to extract some raw clip data from your Centera devices. Different applications will write to Centera differently, and with a different clip/tag/attribute structure, so it’s important to figure out which data on your Centera devices you want to migrate, and what that data looks like; the raw extraction is what gives us the information needed to make those determinations.
For our purposes, we will connect to an EMC Centera test box which is packed with different types of information written by different applications over the years.
To start we install and run the HubStor Centera Migrator Utility, and create a new session, which we’ll call Extraction1:
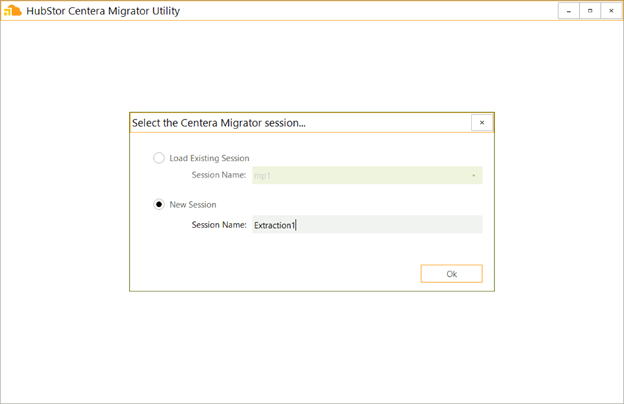
Figure 1. Creating a new HubStor Centera Migrator Utility session.
We then configure our newly created session to point to the publicly accessible Centera cluster:
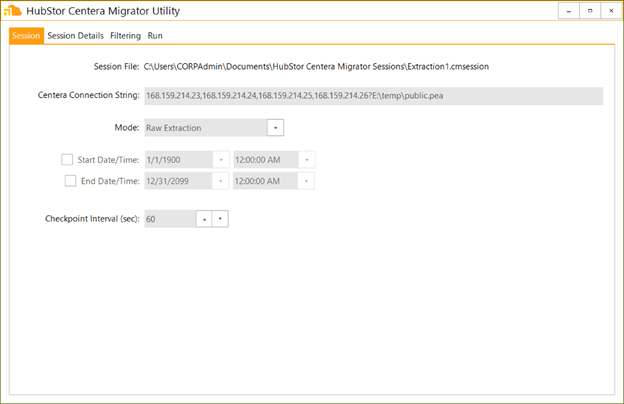
Figure 2. Configure the Centera connection.
As you can see, in addition to connecting to a Centera device, we have specified this session to work in raw extraction mode, meaning that when run, it will pull clip data from the Centera device. For this example, I have chosen not to configure a start and end date, meaning the extraction session will start with the oldest data on the Centera cluster, and work its way forward. But, if you know the date range of relevant content, you can easily restrict to clips written in that time period only.
Next, we move to the Session Details tab, where we can configure the additional options specific to a raw extraction session, namely the output path:

Figure 3. Configure the raw extraction session details.
The output path can be any UNC accessible device, but usually these extractions aren’t very large, so a local drive will offer sufficient space.
That said, you do have the option of checking the ‘Download Blobs’ option, which will actually download the binary data for each clip, in addition to the metadata. In this case your raw extraction session has the potential to generate a lot of data, so typically you’ll want use this option selectively.
Once you’ve got your settings configured, it’s time to run the raw extraction:
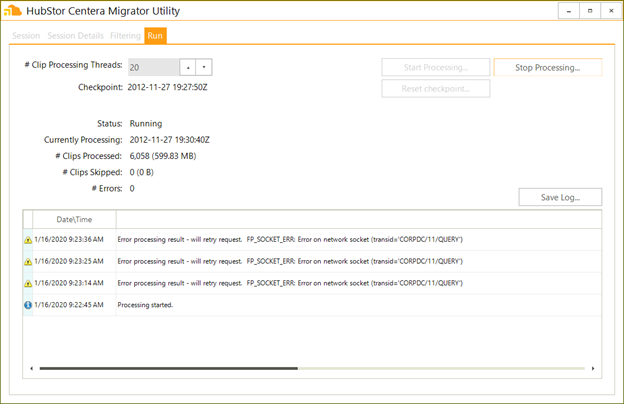
Figure 4. Running the raw extraction against Centera.
In a lot of cases, you’ll simply run the raw extraction for a few minutes or hours, to get a representative sample set for analysis. Once you feel you’ve got enough clips processed, simply click the ‘Stop Processing’ button.
Step 2: Analysis
The analysis step is all about using the output of the raw extraction to figure out the structure of the objects you’ve got on your Centera devices, and how the subsequent migration should be configured.
What did the raw extraction actually give us? Well, let’s browse over to the configured output path and take a look:
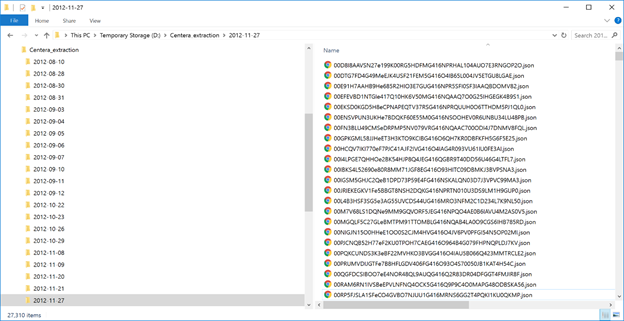
Figure 5. Raw extraction output.
As you can see, the raw extraction created date-based folders, and in each of those folders a series of JSON files have been output. Each of these JSON files is the complete metadata for a single clip in Centera. Here’s an example of one of these files, which I’ve adjusted for brevity:
{
  "Attributes": [
    {
      "Name": "creation.poolid",
      "Value": "861673fa-1dd2-11b2-b535-b66ede9133c1-7"
    },
    {
      "Name": "retention.period",
      "Value": "2025.03.15 00:00:00 GMT "
    },
    ...
    {
      "Name": "name",
      "Value": "ROYAL TECHNOLOGIES S.A.S."
    },
    {
      "Name": "creation.date",
      "Value": "2012.03.13 20:03:30 GMT"
    },
    {
      "Name": "modification.date",
      "Value": "2012.03.13 20:03:30 GMT"
    },
    ...
    {
      "Name": "numfiles",
      "Value": "1"
    },
    {
      "Name": "totalsize",
      "Value": "77322"
    },
    ...
    {
      "Name": "numtags",
      "Value": "1"
    },
    {
      "Name": "Aplicacion",
      "Value": "ROYAL/IMAGE"
    }
  ],
  "CanonicalForm": "GgAAAAAAAIAiXH...AAA==",
  "ClipID": "00GPKGML58JJHeET3H3KTO9KCIBG416O6QH7KR0DBFKFH5G6F5E25",
  "CreationDate": "2012-03-13T20:03:30",
  "EBREnabled": false,
  "EBRPeriod": "00:00:00",
  "FPRetentionClass": null,
  "Modified": false,
  "Name": "ROYAL TECHNOLOGIES S.A.S.",
  "NumAttributes": 18,
  "NumBlobs": 1,
  "NumTags": 1,
  "OnHold": false,
  "RetentionClassName": "",
  "RetentionExpiry": "2012-03-13T20:03:30",
  "RetentionPeriod": "00:00:00",
  "Tags": [
    {
      "Attributes": [
        {
          "Name": "Archivo",
          "Value": "D:\\PRUEBAS\\CCB\\188\\396\\197538165.tif"
        },
        {
          "Name": "Fecha",
          "Value": "13/03/2012 12:49:40 p.m."
        }
      ],
      "BlobSize": 77322,
      "BlobStatus": 1,
      "Name": "Propiedades",
      "NumAttributes": 2
    }
  ],
  "TotalSize": 77322
}
As you can see there is a wealth of information here. To start we can figure out that this appears to be a .tif file that was written by some application or company named ROYAL TECHNOLOGIES S.A.S.. We can see that the item has a retention period specified, and also that it is structured as a single tag with a single blob, which is our image file.
If we think ahead to our migration, there are likely three additional things that we want to make sure are preserved nicely:
- The item name. In this case we can see that standard Name attribute is not going to be suitable. It appears that every clip written by this application has the same name: Royal Technologies S.A.S. Now, that said, we can see that on the tag with the name Propiedades, there is an Archivo attribute, the value of which includes the file name. This field is what we will want to extract and use as the item name in the next step of the migration.
- The item hierarchy. Ideally, we want to be able to determine some folder structure to mirror into HubStor. Now in some cases this data will simply not be present, in which case we will have the option of simply using a date-based folder structure for the migration. However, in this particular example we can see that the same Archivo tag attribute does contain a folder path which would be perfect for replicating into HubStor.
- The retention period. As we’ll see in a following step, we can opt to inherit retention periods with a simple checkbox setting.
Step 3: Migration preparation
Now that we’ve analyzed the data and come up with a game plan for our Centera migration, it’s time to configure the migration preparation session. This session type uses the data from the analysis step in order to extract a quick lookup of all clips with the desired hierarchical structure and naming. This step does not actually download any blobs from Centera, but is all about creating a local index of the clips that need to be migrated.
Once again, we turn to the HubStor Centera Migrator Utility, and this time we create a new migration preparation session. The migration preparation session has different options. The settings are broken down into three tabs:
- General. This tab allows the output location for the index that will be created. Since we are not downloading blobs, space requirements are very low, and any standard drive will typically do.
- Hierarchy. This tab allows you to configure how the folder structure will be derived from a clip. Specifically, you specify a Hierarchy Builder Type, for which there are three options:
-
- Clip Date. Use the date the clip was written to Centera to deduce a date-based folder structure.
- Clip Attribute. Extract the hierarchy based on the value of some clip attribute. Note that regular expressions can be used for this extraction.
- Tag Attribute. The same as the Clip Attribute option, but for an attribute of some specific Tag.
- Clip Name. This tab allows you to configure how the item name is derived from a clip. Specifically, you specify a Clip Name Builder Type, for there are four options:
-
- Clip ID. Use the ID of the clip as its name.
- Clip Name. Use the Name property of the clip directly. This is often a good choice.
- Clip Attribute. Extract the name based on the value of some clip attribute. Note that regular expressions can be used for this extraction.
-
- Clip Tag Attribute. The same as the Clip Attribute option, but for an attribute of some specific Tag.
For our ROYAL TECHNOLOGIES S.A.S. content, we can see that the hierarchy is available in a Tag Attribute, specifically the Propiedades tag’s Archivo attribute. The complication is that we need to extract the hierarchy from the value of this attribute, which is actually a fully qualified path including the item name, which is not part of the hierarchy. Fortunately, HubStor’s Centera Migrator Utility includes the necessary options offer a simple solution.
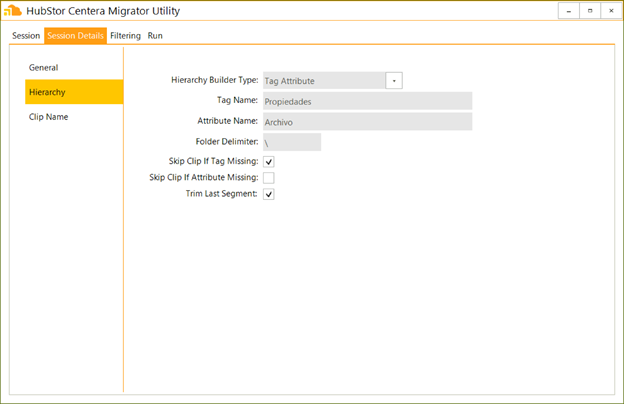
Figure 6. Extracting the item hierarchy.
As you can see above, we are configuring the Tag Attribute builder type for the hierarchy, and pointing it to the desired Archivo attribute of the Propiedades tag. Specifying a backslash as the folder delimiter, and the option to trim the last segment, and the result is that our sample input string of D:\PRUEBAS\CCB\188\396\197538165.tif will be translated into the following hierarchy:
- D
- PRUEBAS
- CCB
- 188
- 396
- 188
- CCB
- PRUEBAS
As for the name to use for the item, we can see that the same Archivo attribute of the Propiedades tag also contains the actual name of the file, which is what we will want to propagate into HubStor. Extracting this will involve the use of a regular expression:
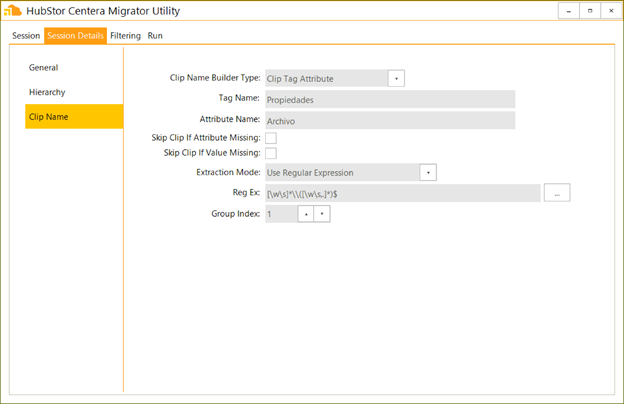
Figure 7. Extracting the item name.
Now, regular expressions are not exactly for the faint of heart, but they do allow us to perform very advanced string parsing and extraction, as you can see in this case. The good news for HubStor’s customers: Our team of skilled engineers will assist you with structuring these regular expressions as needed for your Centera migration.
With all of the options configured, we are now able to run the migration preparation session. As with the raw extraction, we simply use the Run tab to kick things off:
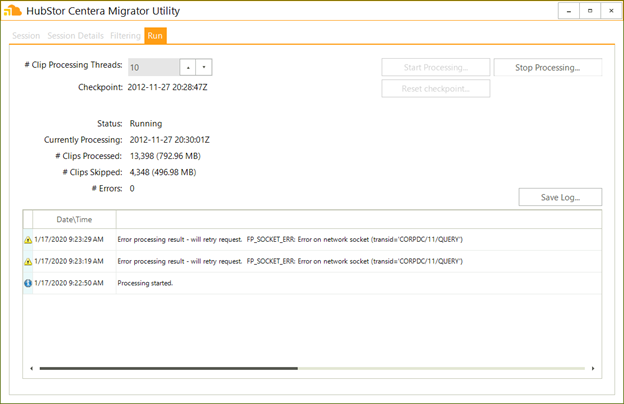
Figure 8. Running the migration preparation.
The output of the migration preparation run is that index of clips to migrate. Essentially a directory structure is created, based on the configured Hierarchy settings, and in each directory a clips.txt file is created containing the list of clips that should be migrated into that corresponding folder in HubStor.
Here’s the result of our migration preparation run:
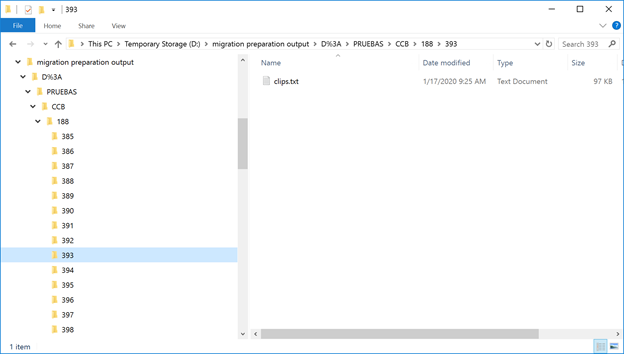
Figure 9. Migration preparation output.
As you can see, the folder structure we’d expect based on the analysis step has been created, and each folder has the clips.txt. For those of you interested, here’s a snippet of what’s in a clips.txt:
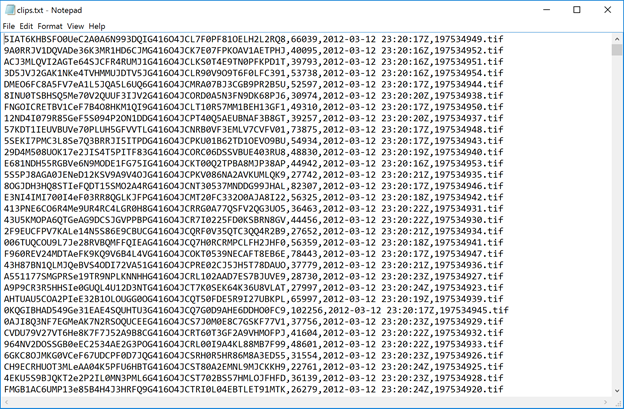
Figure 10. Sample clips.txt.
So, the clips.txt files are essentially csv files which link clips to the basic metadata that will be needed during the migration, such as item name, size, and last modified time.
Step 4: Migration
The final step in your Centera migration is to actually move the data from EMC Centera into HubStor, leveraging the output of the migration preparation step.
For this task, we turn to the HubStor Connector Service (HCS), which is sort of like one-stop shopping for ingesting data into HubStor. The HCS is able to traverse everything from file shares, to SFTP servers, to Office 365 mailboxes and site collections, and much more, and capture that data to the cloud. In this case, we will create a Centera connector:
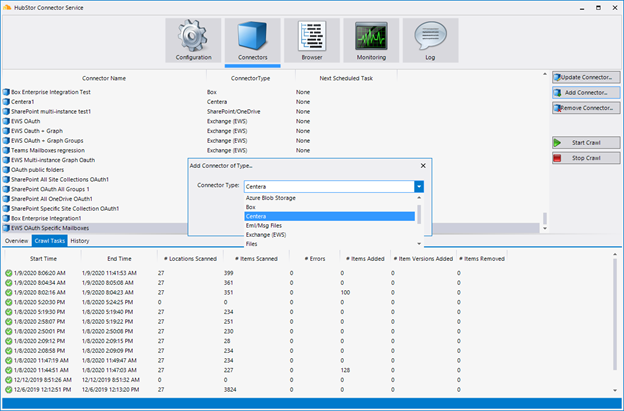
Figure 11. Creating a Centera connector.
Configuring a Centera connector in the HubStor Connector Service turns out to be remarkably simple:
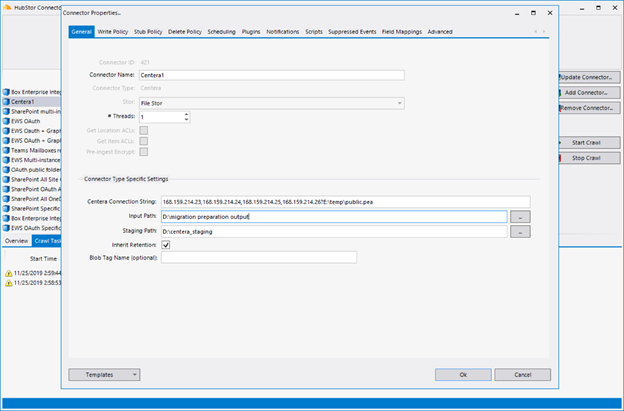
Figure 12. Configuring a Centera connector.
As you can see, we are essentially just configuring the connection to the EMC Centera cluster, just like we did in the HubStor Centera Migrator Utility, and then pointing the connector’s Input Path to the location where we output the clips.txt files from the migration preparation session.
And, of course, there’s the option to Inherit Retention as part of the migration process. When checked, the specific retention for each Centera item migrated will be applied to the migrated item in HubStor. The application of this retention is done as part of the write operation into HubStor, so you can be sure to maintain your compliance posture.
Once you create the Centera connector in the HCS, you simply run the job, and content will migrate from Centera to HubStor, using the source application’s hierarchy and item name. This HCS job represents the actual migration, and is fully resumable; subsequent runs would reattempt any items which failed to migrate on previous jobs. The HCS even has built-in features like compression, scheduling, and upload throttling to ensure you can preserve bandwidth for your regular traffic.
Conclusion
HubStor’s approach to migrating EMC Centera data directly to a WORM compliant cloud is unique in the market. Not only does our migration process include capabilities which are lacking even with the specialized migration firms, but we are able to provide the migration, with support included, for free to our customers.
And, once migrated, your data resides in the HubStor cloud platform, which simplifies how you achieve immutable storage compliance while delivering far superior storage economics for long-term retention.
To learn more about how HubStor can help your organization migrate from EMC Centera and simply compliance storage, please contact us at: sales@hubstor.net.